10. API - Screen
The screen interface is by far the most extensive and complex part of the
pisense library, comprising several classes and numerous functions to handle
representing the screen in a variety of conveniently manipulated formats, and
generation of slick animations. The two most important elements are the main
SenseScreen class itself, and the ScreenArray class which is
used to represent the contents of the display.
10.1. SenseScreen
-
class
pisense.SenseScreen(fps=15, easing=<function linear>, emulate=False)[source]¶ The
SenseScreenclass represents the LED matrix on the Sense HAT. Users can either instantiate this class themselves, or can access an instance fromSenseHAT.screen.The two primary means of accessing and manipulating the screen are:
- The
arrayattribute which returns aScreenArray(a customizednumpy.ndarray). If the array is manipulated, it will update the screen “live”. - The
image()anddraw()methods. The former returns the current state of the display as an 8x8 PILImage, while the latter updates the screen to display the provided image.
Attributes are provided to modify the
rotationof the display, and thegammatable. Thehflipandvflipattributes can be used to mirror the display horizontally and vertically. Finally, several methods are provided for playing animations:slide_to(),fade_to(),zoom_to(), andscroll_text()each of which accept either image or array representations of the screen.The fps parameter specifies the default frames per second for generation and playback of animations (the default if unspecified is 15fps). The easing parameter likewise specifies the default easing function for generation of animations. If the emulate parameter is
True, the instance will connect to the screen on the desktop Sense HAT emulator instead of the “real” Sense HAT screen.-
clear(fill=<Mock name='mock.Color()' id='140237916281768'>)[source]¶ Set all pixels in the display to the same fill color, which defaults to black (off). fill can be a
Colorinstance, or anything that could be used to construct aColorinstance.
-
close()[source]¶ Call the
close()method to close the screen interface and free up any background resources. The method is idempotent (you can call it multiple times without error) and after it is called, any operations on the screen may return an error (but are not guaranteed to do so).
-
draw(image)[source]¶ Draw the provided image (or array) on the display.
The image passed to this method can be anything accepted by
buf_to_image(). The only restriction is that the result must be an 8x8 image.
-
fade_to(image, duration=1, fps=None, easing=None)[source]¶ Smoothly fades the display from its current state to the provided image (which can be anything compatible with
draw()).See the
fade_to()function for more information on the meaning of the parameters. This method simply calls that function with the current state of the display (viaimage()) and the provided parameters, and passes the result toplay().
-
image()[source]¶ Return an 8x8 PIL
Imagerepresenting the current state of the display.The image returned is a copy of the display’s state. Drawing on the image will not update the display. Instead, it is recommended that you perform whatever drawing you wish (e.g. with
ImageDraw), then calldraw()with the image to update the display.
-
play(frames)[source]¶ Play an animation on the display.
The frames provided to this method must be in one of the formats accepted by the
drawmethod; frames itself can be any iterable, including a generator. Frames will be played back at a rate governed by thefpsattribute.
-
scroll_text(text, font='default.pil', size=8, foreground=<Mock name='mock.Color()' id='140237916281768'>, background=<Mock name='mock.Color()' id='140237916281768'>, direction='left', duration=None, fps=None)[source]¶ Renders text in the specified font and size, and scrolls the result across the display.
See the
scroll_text()function for more information on the meaning of the parameters. This method simply calls that function with the provided parameters, and passes the result toplay().
-
slide_to(image, direction='left', cover=False, duration=1, fps=None, easing=None)[source]¶ Slide image (which can be anything compatible with
draw()) over the display in the specified direction.See the
slide_to()function for more information on the meaning of the parameters. This method simply calls that function with the current state of the display (viaimage()) and the provided parameters, and passes the result toplay().
-
wipe_to(image, direction='right', duration=1, fps=None, easing=None)[source]¶ Wipe image (which can be anything compatible with
draw()) over the display.See the
wipe_to()function for more information on the meaning of the parameters. This method simply calls that function with the current state of the display (viaimage()) and the provided parameters, and passes the result toplay().
-
zoom_to(image, center=(4, 4), direction='in', duration=1, fps=None, easing=None)[source]¶ Zoom the display in or out (specified by direction) to image (which can be anything compatible with
draw()).See the
zoom_to()function for more information on the meaning of the parameters. This method simply calls that function with the current state of the display (viaimage()) and the provided parameters, and passes the result toplay().
-
array¶ Returns the screen as a
ScreenArray(a customizednumpy.ndarray). The returned array is “live” and modifications to it will modify the state of the screen. SeeScreenArrayfor more information on the usage and facilities of this class.
-
gamma¶ Returns the gamma lookup table for the screen.
This property returns a 32-element array of integer values each of which is in the range 0 to 31 (5-bits). This forms the “gamma table” of the Sense HAT’s screen and is used to map intensities to their final values on the screen.
Internally, the Sense HAT’s framebuffer uses 5-bits (values 0 to 31) to represent each color. After a color’s Least significant bits have been stripped to reduce it to 5-bits, the resulting value is then used as an index into this list. The value obtained from this lookup will be the final value used when lighting the corresponding LED.
Two “standard” gamma tables are provided:
DEFAULT_GAMMAandLOW_GAMMAwhich can be assigned directly to this property:>>> import pisense >>> hat = pisense.SenseHAT() >>> hat.screen.gamma = pisense.LOW_GAMMA
Note
This property is designed to be assigned to in its entirety. The list returned by it is not “live” (it is a copy of the actual gamma table) and changing individual elements in it will not change the gamma settings.
-
hflip¶ When set to
Truethe display will be mirrored horizontally. Defaults toFalse.
-
raw¶ Provides direct access to the Sense HAT’s RGB565 framebuffer.
This attribute returns a numpy
ndarraycontaining 8x8 unsigned 16-bit integer elements, each of which represents a single pixel on the display in RGB565 format (5-bits for red, 6-bits for green, 5-bits for blue). Internally, the screen actually uses 5-bits for all colors (the LSB of green is dropped); seegammafor more information.The array that is returned is built upon the framebuffer’s memory. In other words, manipulating the array directly mainpulates the framebuffer. As such, this property will not be affected by
hflip,vfliporrotation.
-
rotation¶ Specifies the rotation (really, the orientation) of the screen as a multiple of 90 degrees.
When rotation is 0 (the default), Y is 0 near the GPIO pins and increases towards the Raspberry Pi logo, while X is 0 near the notch at the edge of the board and increases towards the joystick:

When rotation is 90, Y is 0 near the notch at the edge of the board and increases towards the joystick, while X is 0 near the Raspberry Pi logo, and increases towards the GPIO pins:

The other two rotations are trivial to derive from this.
Note
This property is updated by the unifying
SenseHAT.rotationattribute.
-
vflip¶ When set to
Truethe display will be mirrored vertically. Defaults toFalse.
- The
10.2. Animation functions
The following animation generator functions are used internally by the
animation methods of SenseScreen. They are also provided as separate
generator functions to permit users to build up complex sequences of
animations, or to aid in generating other effects like interspersing frames
with other sequences.
Each function is a generator function which yields an Image
for each frame of the animation.
-
pisense.draw_text(text, font='default.pil', size=8, foreground=<Mock name='mock.Color()' id='140237916281768'>, background=<Mock name='mock.Color()' id='140237916281768'>, padding=(0, 0, 0, 0), min_height=8)[source]¶ Renders the string text in the specified font and size, returning the result as an
Image.The
draw_text()function is useful for generating anImagecontaining the specified text rendered in the given font and size. The default font (default.pil) is a fixed height, variable width font particularly suited to low resolution displays like the Sense HAT (the font is limited to 5x7 grid).One other specially made font (
small.pil) is also provided which limits itself to a 3x5 grid. It is less readable thandefault.pilbut can fit more on the display which can be useful in certain circumstances. Other valid values for font are any TrueType or OpenType font installed on the system. If the font is within the font search path, only the base filename needs to be specified. For example:>>> from pisense import * >>> img = draw_text('Hello!', font='Piboto-Light.ttf') >>> img.size (20, 8) >>> arr = array(img) >>> arr.show() ██ ██ ██ ██ ██ ██ ██ ██ ██ ██ ██ ████ ██ ██ ████ ██████████ ██████████ ██ ██ ████ ██ ██ ██ ██ ██ ██ ██ ██ ██ ████████ ██ ██████
As can be seen, when rendered small most TrueType and OpenType fonts don’t look very good (although there are some exceptions), although they do look “smoother” than shown above due to the anti-aliasing used. Here’s the default font for comparison:
>>> img = draw_text('Hello!')
>>> img.size
(28, 8)
>>> arr = array(img)
>>> arr.show()

██      ██              ████    ████                ██
██      ██                ██      ██                ██
██      ██    ██████      ██      ██      ██████    ██
██████████  ██      ██    ██      ██    ██      ██  ██
██      ██  ██████████    ██      ██    ██      ██  ██
██      ██  ██            ██      ██    ██      ██
██      ██    ██████    ██████  ██████    ██████    ██
The foreground and background parameters specify
Colorinstances for the text and background colors respectively, which default to white text on a black background.The padding parameter specifies the number of pixels of padding that should be included in the resulting image. This is specified as a 4-tuple of values representing the left, top, right, and bottom padding respectively. The default is no padding.
Finally, the min_height parameter ensures the resulting image (including padding) is guaranteed to be at least min_height pixels high. This defaults to 8 and is a convenience for when you know you are working with a smaller font (like
default.pilorsmall.pil). It ensures that horizontal slices of the result can be assigned to the display without worrying about the vertical slicing.
-
pisense.fade_to(start, finish, duration=1, fps=15, easing=<function linear>)[source]¶ Generator function which yields a series of frames fading from the start frame to the finish frame. Each frame will be a
Imagewith the same size as the start and finish frames (which must be the same size).The duration and fps parameters control how many frames will be yielded by the function. The duration parameter measures the length of the animation in seconds, while fps controls how many frames should be shown per second. Hence, if duration is 1 (the default) and fps is 15 (the default), the generator will yield 15 frames.
The easing parameter specifies a function which controls the progression of the fade. See Easing functions for more information.
-
pisense.scroll_text(text, font='default.pil', size=8, foreground=<Mock name='mock.Color()' id='140237916281768'>, background=<Mock name='mock.Color()' id='140237916281768'>, direction='left', duration=None, fps=15)[source]¶ Generator function which yields a series of frames depicting text scrolling in direction across the display. Each frame will be a
Image8x8 pixels in size.The text, font, size, foreground, and background parameters are all equivalent to those in
draw_text()(which is called to handle rendering the text).The direction parameter defaults to ‘left’ which results in the text scrolling from the right-hand side of the display towards the left (the typical direction for left-to-right languages). The value ‘right’ can also be specified to reverse the scrolling direction.
The duration and fps parameters control how many frames will be yielded by the function. The duration parameter measures the length of the animation in seconds, while fps controls how many frames should be shown per second. Hence, if duration is 2 and fps is 15, the generator will yield 30 frames.
The default for duration is
Noneindicating that the function should determine the duration based on the length of the rendered text (in this case fps is ignored). In this case the generator will produce frames which scroll 1 pixel horizontally per frame.The resulting animation will start with a full frame of background color; the text will appear to scroll onto the display, and off again with the final frame guaranteed to be another full frame of background color.
-
pisense.slide_to(start, finish, direction='left', cover=False, duration=1, fps=15, easing=<function linear>)[source]¶ Generator function which yields a series of frames depicting the finish sliding onto the display, covering or displacing the start frame. Each frame will be a
Imagewith the same size as the start and finish frames (which must be the same size).The direction parameter controls which way the finish frame appears to slide onto the display. It defaults to ‘left’ but can also be ‘right’, ‘up’, or ‘down’. If the cover parameter is
False(the default), then the start frame will appear to slide off the display in the same direction. If cover isTrue, then the finish frame will slide over the start frame appearing to cover it.The duration and fps parameters control how many frames will be yielded by the function. The duration parameter measures the length of the animation in seconds, while fps controls how many frames should be shown per second. Hence, if duration is 1 (the default) and fps is 15 (the default), the generator will yield 15 frames.
The easing parameter specifies a function which controls the progression of the fade. See Easing functions for more information.
-
pisense.wipe_to(start, finish, direction='right', duration=1, fps=15, easing=<function linear>)[source]¶ Generator function which yields a series of frames depicting the finish frame gradually replacing the start frame. Each frame will be a
Imagewith the same size as the start and finish frames (which must be the same size).The direction parameter controls which way the finish frame appears to replace the rows or columns of the start. It defaults to ‘right’ but can also be ‘right’, ‘up’, or ‘down’.
The duration and fps parameters control how many frames will be yielded by the function. The duration parameter measures the length of the animation in seconds, while fps controls how many frames should be shown per second. Hence, if duration is 1 (the default) and fps is 15 (the default), the generator will yield 15 frames.
The easing parameter specifies a function which controls the progression of the fade. See Easing functions for more information.
-
pisense.zoom_to(start, finish, center=(4, 4), direction='in', duration=1, fps=15, easing=<function linear>)[source]¶ Generator function which yields a series of frames depicting the finish zooming to fill the display, with the start frame ballooning out of the display or shrinking to a point. Each frame will be a
Imagewith the same size as the start and finish frames (which must be the same size).The direction parameter defaults to ‘in’ which means the finish frame will start as a single point at the (x, y) coordinates given by center, and will expand to fill the display. The direction can also be ‘out’ in which case the start frame will shrink towards to the center point with the finish frame appearing around the edges.
The duration and fps parameters control how many frames will be yielded by the function. The duration parameter measures the length of the animation in seconds, while fps controls how many frames should be shown per second. Hence, if duration is 1 (the default) and fps is 15 (the default), the generator will yield 15 frames.
The easing parameter specifies a function which controls the progression of the fade. See Easing functions for more information.
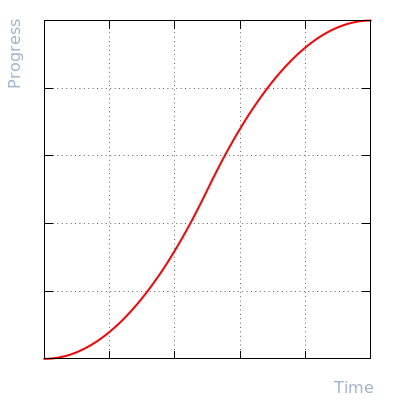
10.3. Easing functions
The easing functions are used with the animation functions above for their easing parameters.
An easing function must take a single integer parameter indicating the number of frames in the resulting animation. It must return a sequence of (or generator which yields) floating point values between 0.0 (which indicates the start of the animation) and 1.0 (which indicates the end of the animation). How fast the value moves from 0.0 to 1.0 dictates how fast the animation progresses from frame to frame.
Several typical easing functions are provided by the library, but you are free to use any function which complies which this interface. The default easing function is always linear:
-
pisense.linear(steps)[source]¶ Linear easing function; yields steps values between 0.0 and 1.0.
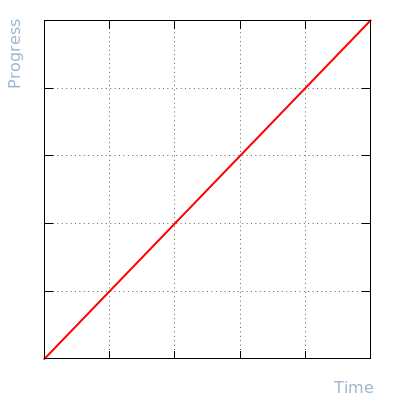
This is the default easing function which simply progresses the animation at a constant rate from start to finish.
-
pisense.ease_in(steps)[source]¶ Quadratic ease-in function; yields steps values between 0.0 and 1.0.
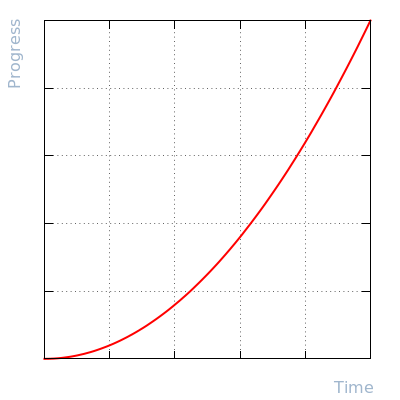
This function starts the animation off slowly, and builds speed as it progresses, finishing abruptly.

10.4. Gamma tables
Two built-in gamma tables are provided which can be assigned to
SenseScreen.gamma. However, you are free to use any compatible list of
32 values.